Author Archive
Initial Software for the Android Car Radio
by balleman on May.05, 2013, under Linux, Radio
Rooting
Let’s face it, Android is far more interesting when you have full control of it. The software pre-loaded on the unit does not provide root access. Hal9k_ on the xda-developers forum has created a software update that provides root and adds some additional features. To perform the update, you place the files on the root of the removable SD card, power off the radio by holding down the volume knob/button, and start the radio by holding down the volume knob/button and the menu button simultaneously.
Network Connectivity
Not exclusively a software topic, but I’ll cover this here. For full functionality, it is desirable to have the radio with internet connectivity whenever possible. When at home, this means a WiFi connection to the home network. The location of the WiFi dongle provides decent signal strength to the home network from the usual vehicle locations and works as well.
For mobile connections, it is possible to use a 3G USB dongle to provide the unit with network connectivity. I don’t have such a dongle, and with mobile provider pricing structures such as they are, I have no intention of providing my car radio with a dedicated service at this time. The alternative is to tether to my cell phone, which is also an Android device. Right now, I’m using MacroDroid on my Nexus 4 to enable and disable the WiFi hotspot feature automatically. The rules I have are:
- On Bluetooth connect to the Radio, and WiFi is not connected on the phone, enable the hotspot.
- On WiFi disconnect, and Bluetooth is connected to the Radio, enable the hotspot.
- On Bluetooth disconnect from the Radio, and hotspot enabled, disable the hotspot.
This tries to prevent enabling the hotspot in cases where WiFi is available, but properly turn on the hotspot if driving out of range of the home WiFi. So far it seems to work relatively well.
One additional area of interest is how to show the cell phone signal strength on the radio. I found the Tether Signal Strength app that provides a capability for this. Unfortunately, the current design of the app makes the signal strength hard to see, and worse, is not easily automated to start on boot on the radio, or start on hotspot on the cell phone. I think either improvements to this app, or maybe a new one entirely, will be the solution.
GPS and Navigation
Always-On GPS
Android generally will only enable the GPS receiver when there is an application actively using it, primarily as a power-saving measure. Even though there are no real power usage concerns with this device, the default software still disables the GPS receiver when not in use. Since GPS takes some time to acquire, I really prefer it to be active the entire time the device is running. I found the ActiveGPS app to meet this need, but there are probably other 3rd party apps that do just as well. As with the rest of my Android devices, I installed GPS Status to be able to check the received signal strength from the GPS constellation.
Navigation
Google Maps and Navigation are certainly part of the solution for navigation on an Android device. I did want to try an App that provided similar functionality to the Garmin nüvi (ad) that I’ve used for years. While Garmin does sell navigation software for Android, from what I can tell, the reviews of recent versions have not been great, and it is also not currently available for customers in the US. I wanted something that would be fully functional when working without an Internet connection, since when I’m off exploring in the mountains and valleys around here, it’s fairly common to be without connectivity.
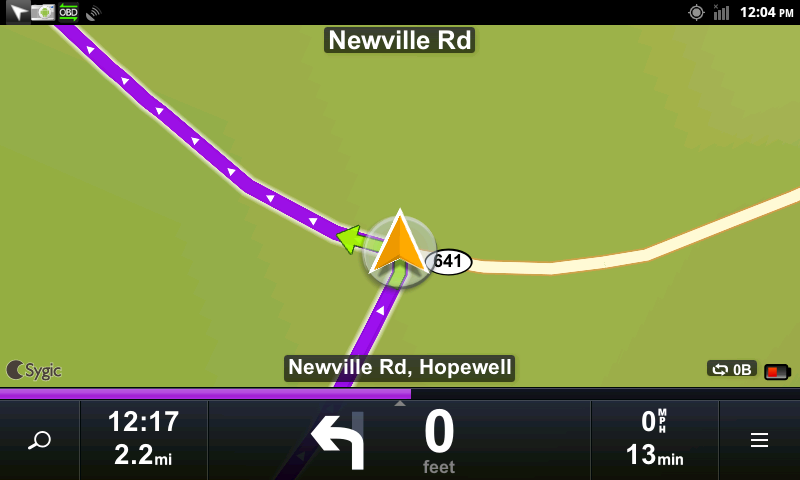
Currently, I’m using Sygic for this purpose. I’m not entirely sold on it, but it does appear to be functional. Depending on how actual use goes, I may just use it as a backup for the more accurate Google Navigation. Here are some notes, observations, etc:
- The navigation does not appear to be extremely efficient. I plugged in a destination of Renovo, PA from home, and the proposed route was something like 2 hours longer (and very far out of the way) as opposed to Google or the Nuvi.
- It has a small battery display which I have not found a way to turn off. It’s obviously irrelevant for the car radio.
- By default, it notifies on sharp turns and railroad crossings. While it starts out kind of novel, it quickly becomes annoying. Fortunately, these can be easily disabled in settings.
The jury is still out on this.

Vehicle Sensors and Diagnostics
It seems that the application for OBD2 stuff on Android is Torque, and it is pretty awesome.
OBD2 Interface
The most common way of connecting to OBD2 seems to be to use a Bluetooth to OBD2 bridge. The Bluetooth capability of the radio, however, is not accessible to Android. The updated software provided by Hal9k_ provides a work-around to this, by adding the kernel modules necessary to support Bluetooth. You are then able to use a Linux-supported Bluetooth USB dongle. You need to install a 3rd party Bluetooth manager application, since the Bluetooth settings applet is not included in the software. When paired with an OBD2 Bluetooth adapter (ad), you’re able to use Torque.
There are some apparent downsides to this approach. For the cheap adapter I bought, it is powered by the OBD2 port and stays active even when the engine is off. I’m not sure how significant of a drain this would be, but I would prefer not to deal with it. The second issue is related to security. The Bluetooth adapter uses a fixed, default security code for pairing, and appears to always be available to pair. It would not surprise me at all if the OBD2 could be abused to do terrible things, such as unlock the doors, by someone knowledgeable. Sure, this is probably a very small risk, but I’d prefer to avoid it. (I think those of you with OnStar are insane from a someone-else-can-control-my-vehicle-remotely standpoint).
Alternatively, Torque also supports OBD2 to USB adapters. Hal9k_’s software update also provides the pl2303 kernel module, which supports the USB to serial bridge used by many of these adapters. If you have one of these, the only additional thing you need to do is configure Torque to use it. While Torque does have USB settings in its menu, these appear to be insufficient and you need to create a configuration file that makes it think it is a Ca-Fi unit.
echo "finland_rds_ru" > /etc/carit_version2 ; chmod 644 /etc/carit_version2
Alas, the OBD2 to USB adapter (ad) that I bought does not use the
pl2303, and instead needs cp210x. I did successfully build and install the cp210x kernel module, but it was an ordeal that deserves its own article. The adapter is powered by the USB, so it does not draw power when the vehicle is off.
Sensor Monitoring
Torque provides a variety of dials and graphs that can be used to display sensor data. You place them on a grid on the screen, and can swipe to page between multiple screens. I found it difficult to get accurate placement using the resistive touchscreen, so I used a USB mouse for most of the screen setup. As far as the sensors themselves, I was just recently able to add what seems to be a transmission fluid sensor reading. I still can’t find a usable PID for fuel level, which I found odd, since my truck and previous car both support the general PID for this, which is apparently not common. I would also like to find a way to show more details about transmission operation, such as current gear.

Software-Defined Radio
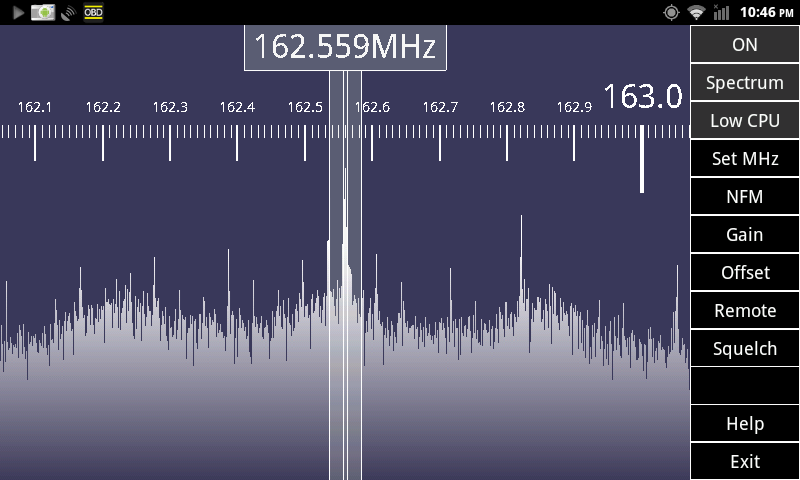
When I saw Doug give a short presentation on SDR on Android using the same RTL2832U/E4000 USB dongles that I have laying around, I knew this had to be an objective of my Android-in-the-car project. On the face of it, it looked as if it could be a problem. Most of the information on the SDR Touch software was on Android 3.0 or higher, while the head unit still runs 2.3. I also was concerned that the device would not have enough CPU power to make it work, or that the USB port would not have enough power to keep it working. Fortunately, these concerns were mostly unwarranted.
Out of the box, the software did fail to work. After some Google’ing, it was determined that the chmod that comes with this system does not support the -R option. This caused the software to fail when trying to change the permissions on the USB devices. Mounting the /system file system as read-write, and then linking chmod to the busybox binary, resolved the problem.
As far as CPU usage was concerned, it was not as bad as I feared it might be. Here is a table of observed CPU usage of the androsdr2 process, when performing NFM demodulation with different settings. In all cases, the rtl_tcp_andro process is running at a steady 5% CPU utilization, which is not included in the numbers below. Also, as one would expect and hope, when the app is not in the foreground it behaves as if the spectrum display is off. There was a noticeable, but not substantial, degradation in audio quality with the Low CPU option enabled.
| SDR CPU Selection | Spectrum Display | CPU Usage |
|---|---|---|
| normal | on | 57% |
| normal | off | 42% |
| low | on | 33% |
| low | off | 15% |
The user interface of the software is not very well suited (yet) for use in a vehicle. Too much user interaction is required to operate it. When loading the software, it does not automatically enable the radio. You have to select the “Off” button to turn it on. It does remember the last tuned frequency, but it does not remember the bandwidth last selected. In my case, to listen to the local weather band transmissions, it greatly improves the intelligibility of the audio to narrow the reception bandwidth. This requires something of a precise dragging motion on the screen, which is not trivial with the resistive screen, and is not really possible while the vehicle is in motion. Some minor improvements in the app could really improve this – such as remembering the last bandwidth, enabling the radio reception upon the app starting, and providing a means of having pre-sets of frequency and other parameters for listening to favorites.
Overall, this is still an amazing capability to be able to add to a car radio head unit.
There is probably more to say on this, but the article is long enough.
RAV4 Android Radio Install
by balleman on May.02, 2013, under Computers, Linux
A brief description of installing my Android 2DIN radio in my 2011 RAV4 w/ JBL.
Parts List
- Pure Android 2 DIN Radio (Generic or Ouku TH8581GA)
- USB WiFi dongle, included with the radio.
- Scosche TA2055B – RAV4 DIN Mounting Kit (ad)
- PAC TATO
(ad) – kit to integrate with factory amplifier
- AmazonBasics USB 2.0 4-Port Ultra Mini Hub (ad)
- ELM327 USB OBDII Adapter (ad)
- Short USB extension cable (ad)
- Solder, heat shrink tubing
- RTL2832U SDR USB dongle
Tools
- Plastic putty blade
- 10mm bolt driver
- Soldering iron
- Heat gun
Wiring Harness
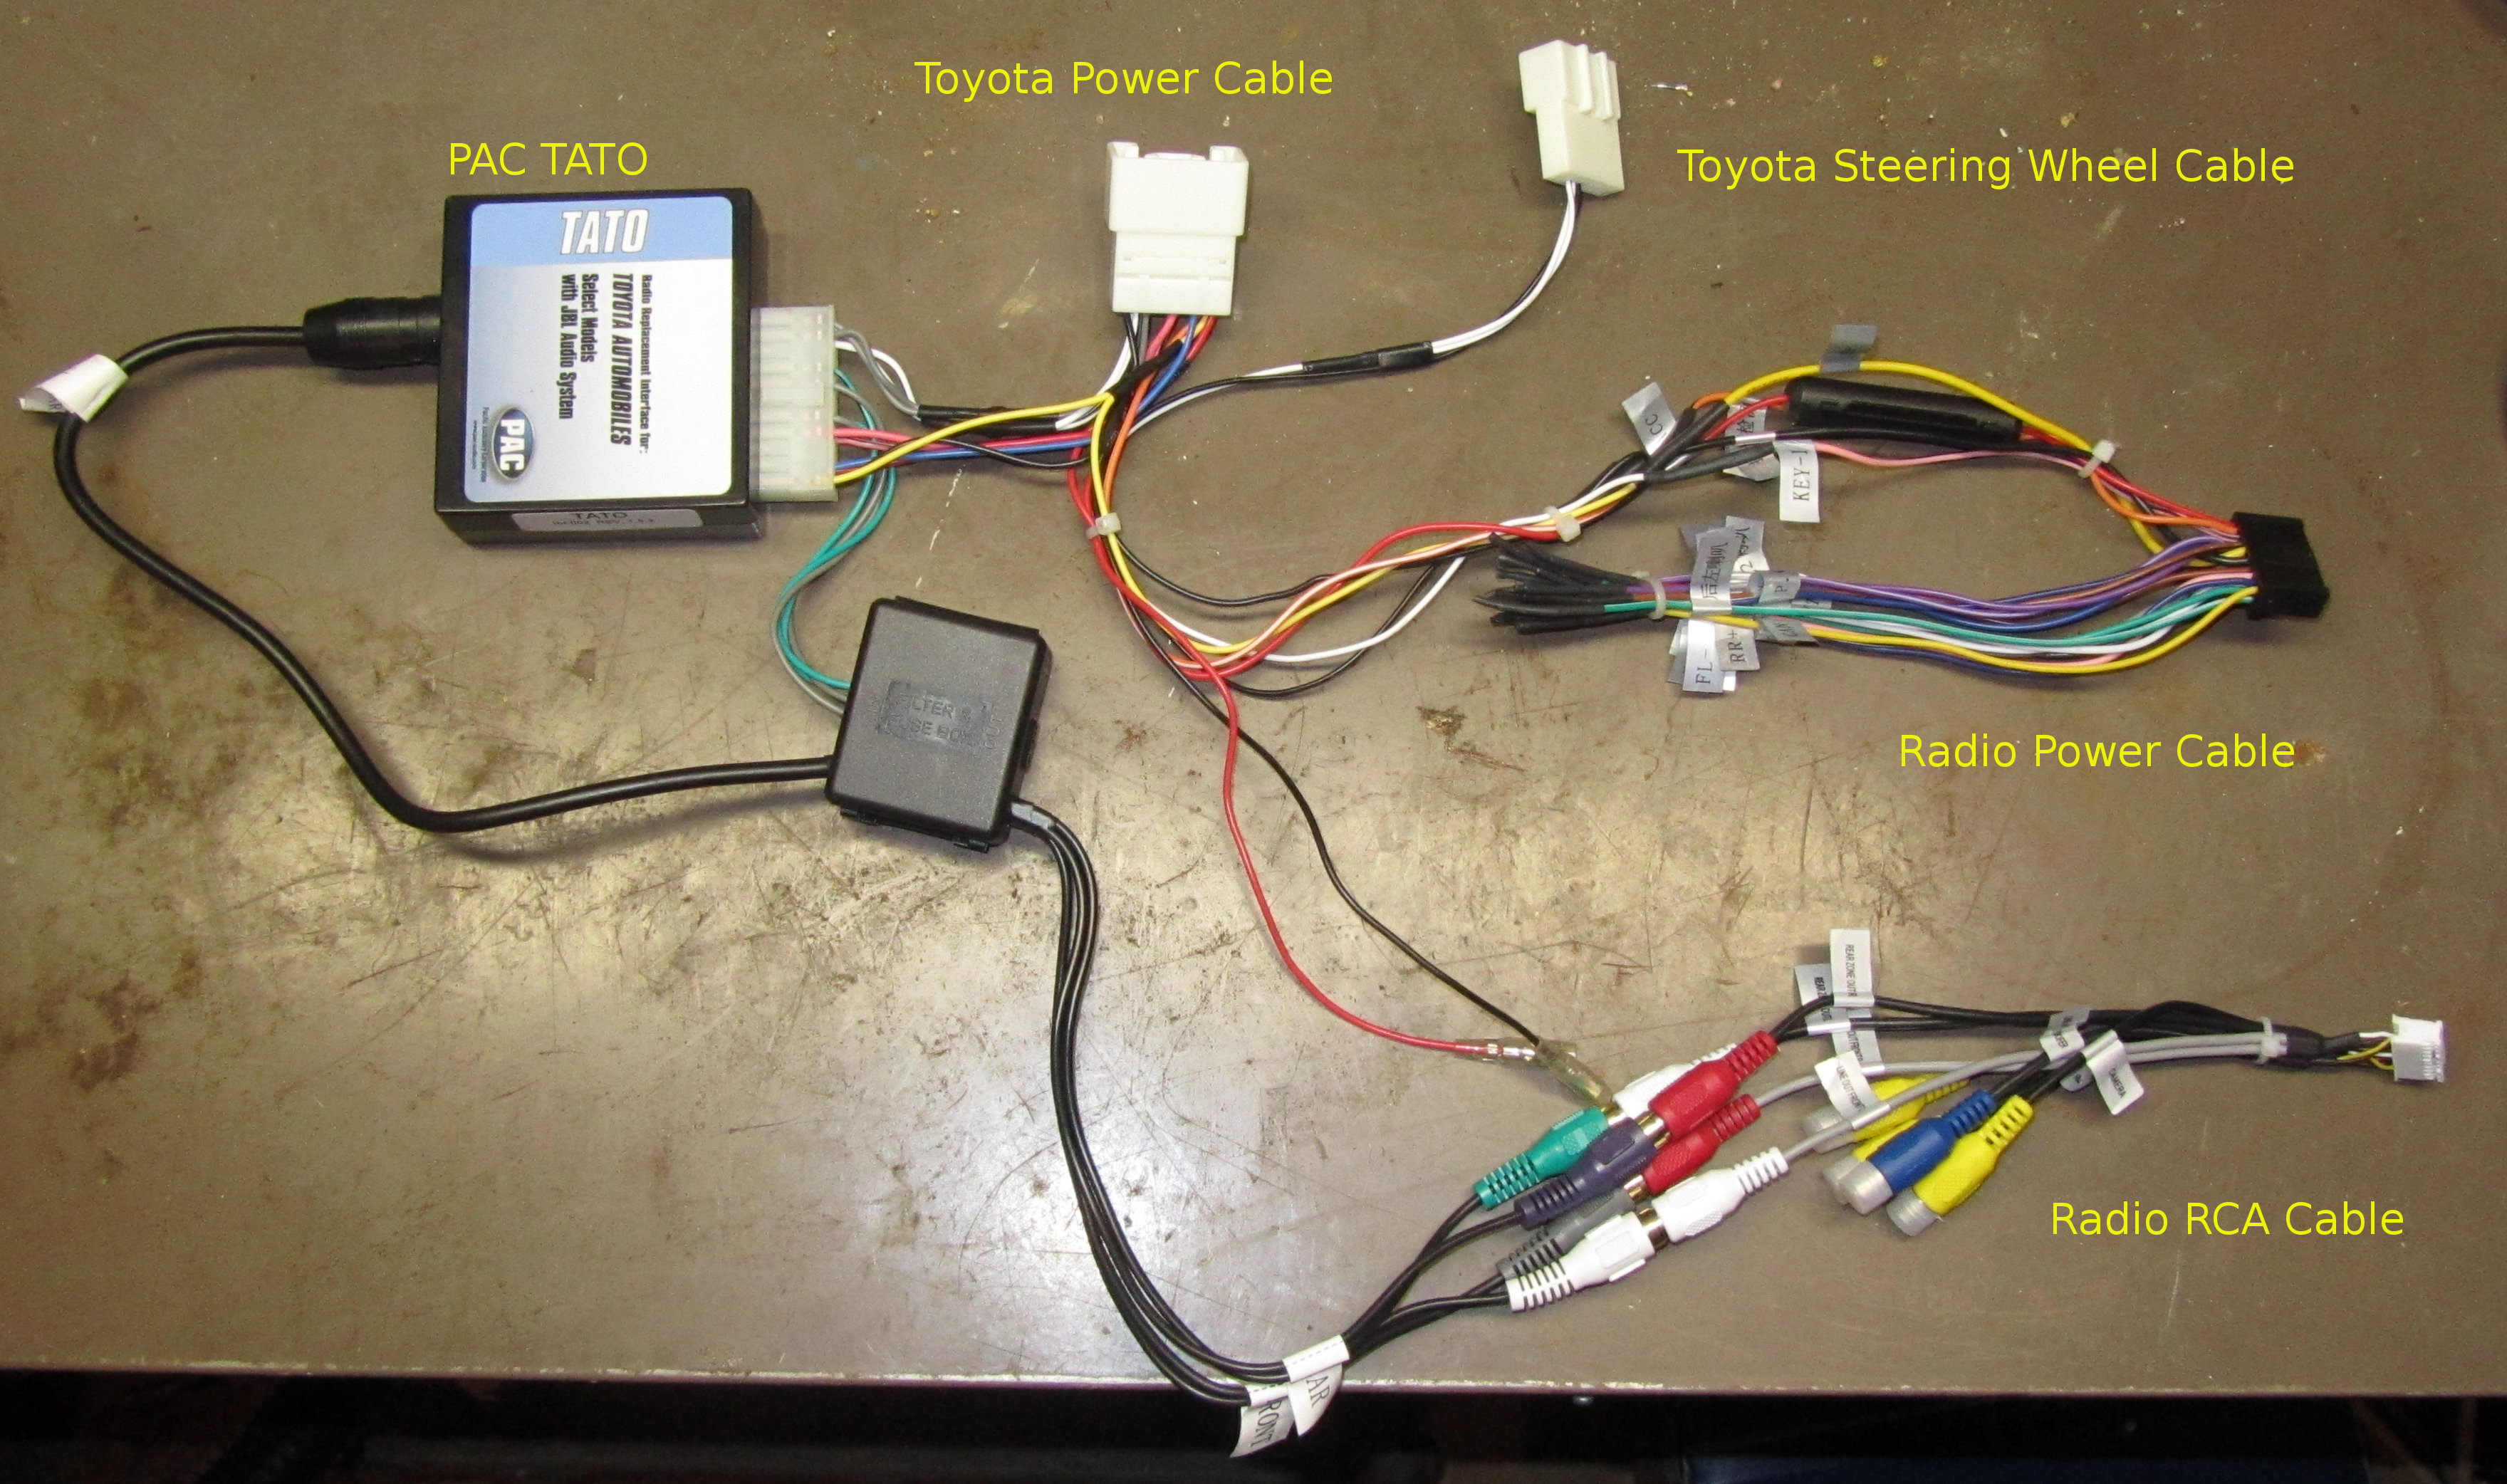
Since I have the JBL audio system in the RAV4, I purchased a PAC TATO (ad) which included the necessary wiring harness, in addition to providing the signaling to turn on the factory amplifier. I connected the ground, accessory, battery, accessory, and illumination wires between the TATO harness and the radio harness. The TATO also came with an adapter to connect a PAC steering wheel control converter to the separate Toyota harness with those connections. I experimented and determined that the steering wheel control wire on the radio harness worked properly with the white wire on this harness, so I cut it off and wired it in. I soldered all connections and covered them with heat shrink tubing, also using heat shrink tubing to cover the unused wires that were not already covered.
The radio harness had no connections for a microphone, and I was not able to easily find a harness that supported the RAV4’s factory microphone or AUX input.
Old Radio Removal
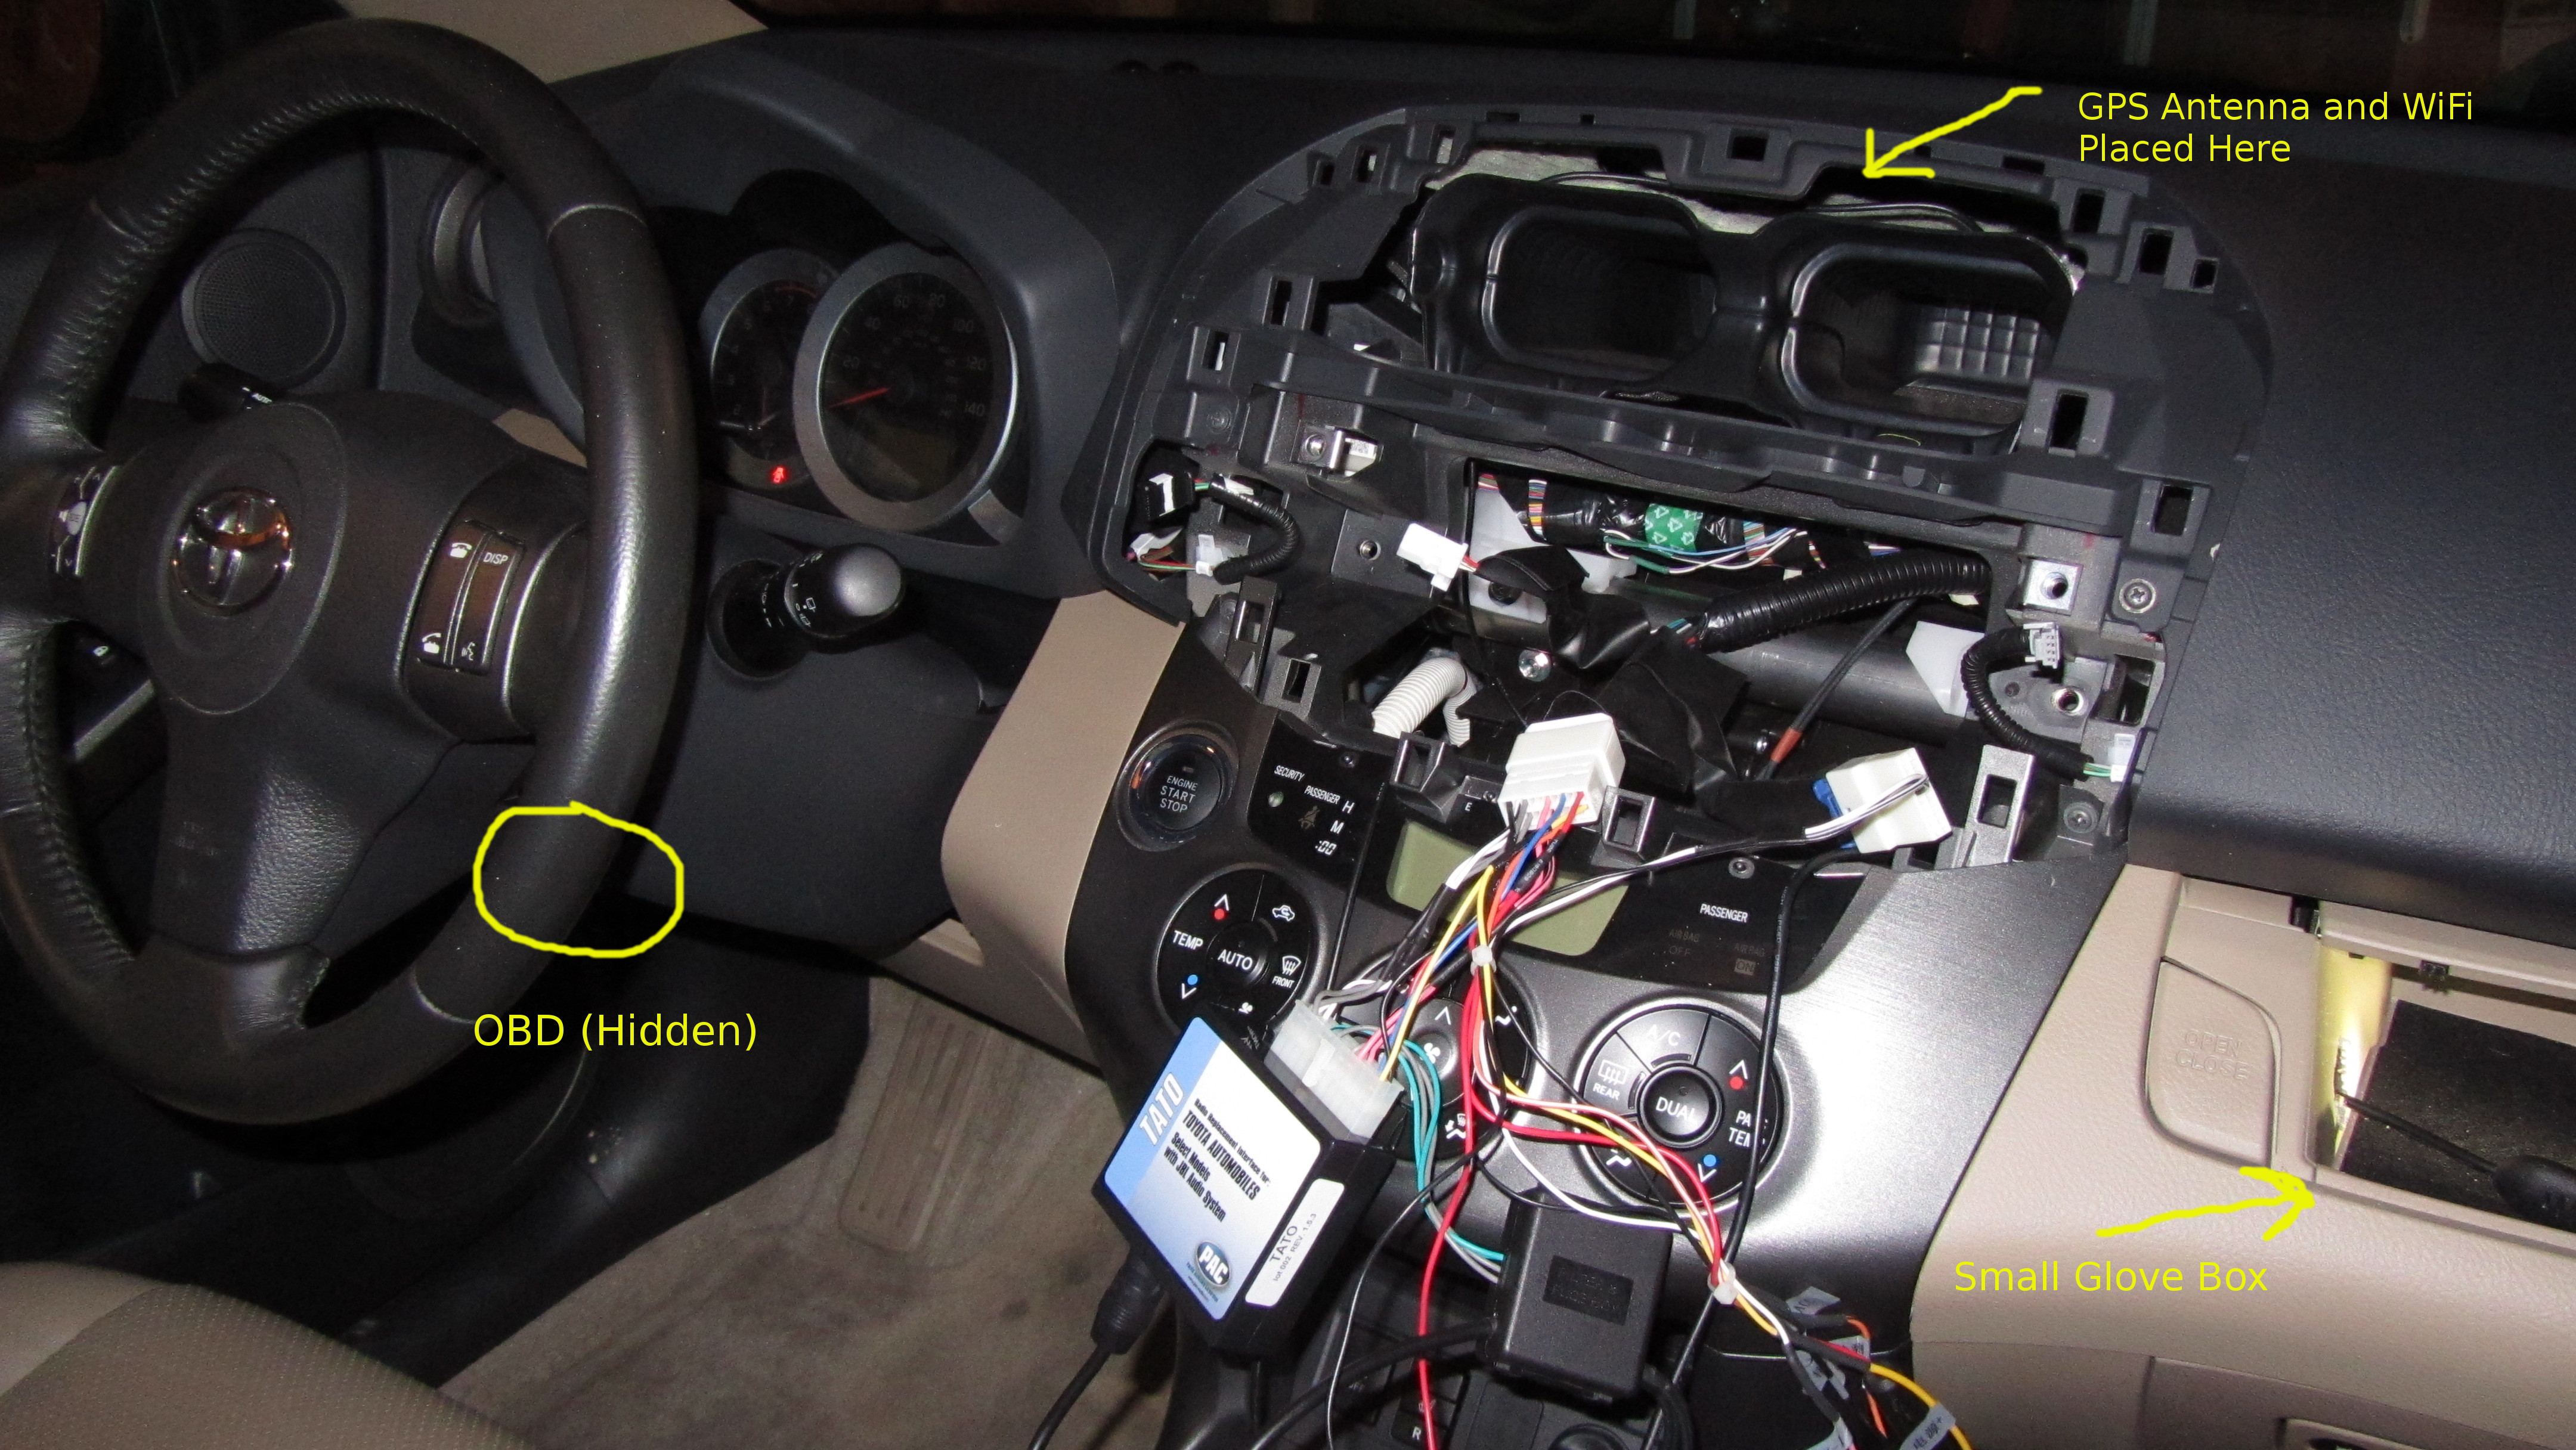
I removed the trim panels using a plastic putty spreader that I had laying around. It was a little tough to get it inserted initially, but it did the job with no noticeable marking. After removing the trim panels, I detached the cables to them and set them aside. I then used the bolt driver to remove the 4 bolts to the radio and removed it, and then detached the radio from its cabling. In the course of repeating this several times (playing with the new radio), I ended up losing one of the bolts – so do better than me, and keep a tight grip on them or use a magnetic tool. You can watch this video of someone else removing the radio in a RAV4.
Placement of New Hardware
There is a good amount of space in the center console that easily accommodated the radio and associated wiring. The RAV4 also has a small secondary glove box above the main glove box. I chose this location to place the USB hub (in order to have it accessible), so I cut a hole in the glove box towards the center console. I routed the USB cable from the radio, as well as the AUX A/V RCA inputs, to the glove box. I also observed a void above the center air vents, above some insulation, that was readily accessible. In this space I placed the GPS antenna as and the WiFi USB dongle on an USB extension cable that was routed to the glove box. The OBDII adapter was attached to the OBDII port and the cable routed in the lower driver’s side dash into the center console, and from there to the glove box, the provided cable being sufficient.
SDR Notes
I also purchased and adapter and splitter for connecting the SDR dongle to the factory AM/FM antenna, but its performance was very poor when trying to receive weather band frequencies. I also tried placing the antenna that came with the SDR dongle in the same location as the GPS antenna, but it also performed poorly. For now, the provided antenna is stowed in the glove box, and can be used somewhat effectively when magnetically attached near the sunroof.
Finishing
With the radio attached to the RAV4 mounting kit, it fit easily back into the dash, and looks pretty good. Up next… software.
TH8581GA Hardware Specs
by balleman on Apr.29, 2013, under Computers, Linux
The generic double-DIN Android head unit I purchased is a TH8581GA. Sometimes branded as an Ouku, the unit appears to be a close cousin to the Ca-Fi 621000.
Specs
| Platform | Freescale MX53 |
| CPU | ARM Cortex-A8 (ARMv7 rev5); 1GHz |
| RAM | 512MB; 334 MB available to Linux |
| Storage | Onboard 7.39 GiB (per Linux; mmcblk0) Front Panel MicroSD slot (mmc1) |
| Display and Input | WVGA (800×480) 6.2″ display Resistive touch screen |
| USB | Rear panel, USB Type A receptacle, corded, host port. Front panel, USB Mini-B receptacle, OTG port. |
| Rear A/V | 3x RCA – AUX In (Left, Right, Composite Video) 2x RCA – Rear Monitors (Composite Video) 1x RCA – Rear Camera (Composite Video) 5x RCA – Line Out (FR, FL, RR, RL, Sub) DIN – IPod connector |
| Power, Signal, and Speaker (wire) |
2x CanBus (Tx/Rx) 8x Speaker (Front R/L +/-, Rear R/L +/-) 1x Parking break 1x Reverse 1x Ground 1x Battery + 1x Accessory Power 1x Illumination 1x Amplifier Signal input 1x Auto radio Antenna 2x Steering Wheel Control |
| Antenna | 1x Motorola antenna (for AM/FM radio) 1x DVB antenna (for TV tuner) 1x SMA? antenna (for GPS receiver) |
Notes and observations
Bluetooth: The radio does have built-in Bluetooth, but it is not managed by Android. Pairing with the radio allows for interacting with the Phone application on the radio (handsfree), as well as passing through A2DP audio. However, it is not possible to use the built-in Bluetooth for pairing with other devices through Android, such as a OBDII bridge.
Booting: The radio takes about 40 seconds from power-on to Android, another 10 seconds before the internal and external storage is mounted, and in my case, about 10 more seconds for the on-boot apps to finish loading. The radio does not appear to have much of a concept of sleep – when power is removed, the radio is off and requires a reboot. I have noticed in my install that if I power off the vehicle and immediately put it into accessory mode, the radio display will go dark, and come back in several seconds without a reboot. I’m not sure of the exact scenario, but I suspect this is more of my vehicle maintaining accessory power for a short while, as opposed to the radio sleeping.
Sensors: I’m used to android devices (e.g., phones) being loaded with an excessive number of awesome sensors, such as compasses, accelerometers, orientation, etc. Unfortunately, this device does not have any of that. So much for having an artificial horizon in my car. It does, however, have an integrated GPS receiver with external antenna (provided).
Other Info: Internal Pictures
Coming up soon… Installation.
Android Car Radio
by balleman on Apr.28, 2013, under Computers, Linux, Radio
Background
While shopping for my 2011 Toyota RAV4, I tried out vehicles that both had and did not have the factory navigation package. I decided that I basically didn’t like it. The one I purchased did not have the navigation package, but did have the “JBL” audio package and Bluetooth hands-free support, which seemed to work well. After having some annoyance in mounting my aging Garmin nuvi (and having it stick properly), problems with the factory radio sometimes not working, and probably some pent up desire for a “project”, I embarked on finding a alternative.
Alternatives
I gave up on any cellphone-only solution since I needed to replace the factory radio anyway, and did not wanted a solution that appeared integrated (e.g., did not involve something with a windshield or bean-bag mount).
One set of options are the new head units that tether to your cell phone, allowing you to control your cell phone through the in-dash unit. These generally involve HDMI output from your phone and use a Bluetooth connection for communicating touch screen interactions. An example is the AppRadio series from Pioneer. In researching this, it appears that the functionality is somewhat crippled out of the box, and that with a 3rd party app (ARLiberator). I do think this notion has promise (and it did finally push me over the edge to buying the Slimport to HDMI adapter
that works with my Nexus 4), but if I had to plug in my phone for each use, it mostly would be left undone except for extended trips. This just did not seem to be the right answer.
The next option was a head unit that natively runs Android. There brand name in this field seems to be Ca-Fi. There are a number of knock-offs of this brand, the most common of which is being actively discussed on xda-developers. I chose to get one of these units, and I will detail that adventure in upcoming articles.
root array, dracut, and block IDs
by balleman on Sep.03, 2012, under Linux
This cost me too much time yesterday and today, so I’ll share it with the world in case I happen to save someone time.
I have been migrating hard drives within my Fedora 16-based server over the past months (yes, it’s taking way too long). A project this weekend was to migrate the root file system from one drive to another. The initial and final states are mdraid mirrors, but in the interim there are two degraded mdraid mirrors – one for the old, one for the new. In attempting to boot from the new device, the boot would fail in dracut rescue mode. I could proceed with mdadm -As ; exit but no matter what I looked at or tried, I could not get the process to proceed on its own. In desperation, I tried adding mdadm -As into a custom dracut module or as part of the stock mdraid module – no luck. Eventually, after turning on and wading through all dracut debugging I could find, which didn’t really help other than making me read the dracut mdraid scripts, the obvious error was revealed. The format of the UUID field that dracut uses is matched against the output of mdadm --examine, and I had copied-and-pasted the output of blkid instead. Only after lining them up did I realize that although the identifiers are the same, the format is different:
blkid: c72b5415-c310-9955-c694-43f9004a021b
mdadm: c72b5415:c3109955:c69443f9:004a021b
The particular kernel line fragment is now: root=UUID=69c0f668-d395-4d45-b3df-5835240a0986 rd.md.uuid=c72b5415:c3109955:c69443f9:004a021b
So… if you’re setting rd.md.uuid in order for dracut to assemble your root array and it’s not working, make sure the parameter is formatted in mdadm style, and not blkid style!
Another tip on the subject: Always make GRUB2 changes using /etc/sysconfig/grub and/or /etc/default/grub and then re-build the grub.cfg file using grub2-mkconfig. Also, don’t use a symlink as a parameter for grub2-mkconfig -o. This will remove the symlink and write a new file at the location of the symlink, not the target. And hence, your changes won’t have happened.


