Linux
Fedora 27, Nvidia, Gnome, and Wayland
by balleman on Mar.26, 2018, under Linux
I’ve been having trouble recently with my home desktop having gnome-shell chew through 100% CPU and leave the system unresponsive. Ordinarily, it seemed that updating the binary Nvidia drivers shortly thereafter would fix it, but not most recently. I followed someone’s suggestion to switch to lightdm instead of GDM, and while that worked, lightdm does not play nicely with Gnome in some ways – specifically screen locking does not integrate, which is quite annoying. Ultimately, I think the problem is the switch from Xorg to Wayland, and the Nvidia drivers not playing nicely with that. I just now switched WaylandEnable=false in /etc/gdm/custom.conf. So far that seems to be working.
Fedora 27 Nautilus does not open files on double-click
by balleman on Jan.15, 2018, under Linux
Recently, I’ve been encountering an annoyance on my Fedora 27 desktop machine. When I would try to open a file by double-clicking it in Nautilius, it would refresh the display, show the “wait” cursor, and then do nothing. Today I finally spent some time to trace it down. A strace of nautilus showed:
[pid 32262] execve("/usr/bin/exo-open", ["exo-open", "--launch", "FileManager", "/home/balleman/Documents/...
Manually running this exo-open command gives the results I was experiencing – it reloads Nautilus but does not open the file. exo-open is part of the Xfce desktop environment, which I’m not actively using. Removing the exo packages and dependencies on it appears to have fixed the problem. Not a perfect solution, but I will gladly take it over spending more time on this.
One reference I found to this possibly being a bug is here:
https://bugs.launchpad.net/ubuntu/+source/exo/+bug/956255
cp210x on TH8581GA
by balleman on May.06, 2013, under Linux
Intro
I have an Android car radio, and this OBD2 to USB adapter (ad). Unfortunately, the rooted firmware currently available does not provide a cp210x kernel module that is needed to make this adapter work. This article tries to describe the process of building and installing one. Much of this article draws on the more general Building a Linux kernel module without the exact kernel headers and adds specifics for this particular purpose. I strongly suggest reading that article for more of the technical details. I don’t doubt there may be easier ways of accomplishing this, but these steps (produced through much trial-and-error and false starts) did work for me.
BLUF
If you don’t need or want the how or the why, install this cp210x.ko in /system/lib/modules and run this update to change the init scripts to load it. Use at your own risk – if you brick your radio, don’t come blaming me. This expects you are already running Hal9k_’s rooted software update.
Building the Module
Finding the Parts
Finding Suitable Kernel Source
Since we’re trying to build a binary module for an already compiled kernel, we need to identify a very close copy of kernel source code to work with. To my knowledge, the exact kernel source used on the Ouku has not been released. Looking through Freescale’s website, I found a link to Linux kernel source for the SABRE tablet platform that seemed to meet the bill. The SABRE for automotive appeared to be an earlier version.
- Page containing: http://www.freescale.com/webapp/sps/site/prod_summary.jsp?code=IMX53_SW&parentCode=IMX53QSB&fpsp=1
- Link towards the download: https://www.freescale.com/webapp/Download?colCode=L2.6.35_11.05_ER_SOURCE&appType=license&location=null&fsrch=1&sr=1&Parent_nodeId=from%20search&Parent_pageType=from%20search&Parent_nodeId=1298573788032723957803&Parent_pageType=product
You need to sign up for a free account with Freescale, and accept their terms and conditions to obtain the download.
Finding Suitable Cross-Compiler
I originally tried compiling with the arm-linux-androideabi-4.4.3 that ships with android-ndk-r8e. Unfortunately, the resulting modules had compatibility problems. The solution was to use arm-linux-androideabi-4.4.0 that ships with android-ndk-r5b which can be found at http://dl.google.com/android/ndk/android-ndk-r5b-linux-x86.tar.bz2.
Obtaining the Kernel Configuration
The kernel provides a copy of its own configuration in the /proc/config.gz file. Copy this file from the unit so we can use it to configure the kernel source.
Preparing to Compile
Untar the cross-compiler
$ tar jxvf android-ndk-r5b-linux-x86.tar.bz2
Setup cross-compiler environment variables
$ export ARCH=arm

$ export SUBARCH=arm

$ export CROSS_COMPILE="/path/to/android-ndk-r5b/toolchains/arm-eabi-4.4.0/prebuilt/linux-x86/bin/arm-eabi-"
Untar the source
$ tar zxvf L2.6.35_11.05.01_ER_source_bundle.tar.gz

$ tar zxvf L2.6.35_11.05.01_ER_source.tar.gz

$ cd L2.6.35_11.05.01_ER_source/pkgs

$ tar jxvf linux-2.6.35.3.tar.bz2

$ tar jxvf linux-2.6.35.3-imx_11.05.01.bz2
Apply provided patches
$ mv patches linux-2.6.35.3

$ cd linux-2.6.35.3

$ ./patches/patch-kernel.sh
Configure the kernel
$ mkdir build

$ gunzip -c /path/to/config.gz > build/.config

$ make silentoldconfig prepare headers_install scripts O=build KERNELRELEASE="2.6.35.3-01274-gb455778-dirty"
Extracting Module Symbols
Even with using this “close enough” kernel and the actual configuration from the running kernel, the module symbols used will not be identical. We need these symbols to compile our module with for it to load successfully.
Obtain the Kernel Image
We have the uImage file from Hal9k_’s software update, so we’ll use that. It is contained in a U-Boot image, so we need to strip the header off of it. We’ll also want mkimage, a utility for making U-Boot images (on Fedora, this is available from the uboot-tools package).
$ mkimage -l uImage

Image Name:   Linux-2.6.35.3-01274-gb455778-di

Created:      Mon Dec 10 02:34:26 2012

Image Type:   ARM Linux Kernel Image (uncompressed)

Data Size:    2547996 Bytes = 2488.28 kB = 2.43 MB

Load Address: 70008000

Entry Point:  70008000
$ dd if=uImage of=kernel.img bs=1 skip=64 count=70008000
Find the kernel base address
From a shell on the car radio, shortly after boot, capture the output of dmesg and look for the “.init” line. I copied it to my desktop first. The first hex address listed is the base address. In our case, it’s 0xc0008000.
$ grep \.init dmesg.txt

free_area_init_node: node 0, pgdat c04f94b4, node_mem_map c0599000

Kernel command line: console=null init=/init androidboot.console=null video=mxcdi0fb:RGB24,SEIKO-WVGA ldb=off di0_primary pmem=32M,64M fbmem=5M gpu_memory=64M calibration

.init : 0xc0008000 - 0xc0037000 ( 188 kB)
Grab glandium’s extract-symvers script
$ wget https://raw.github.com/glandium/extract-symvers/master/extract-symvers.py
Extract the symbols
$ python extract-symvers.py -B 0xc0008000 kernel.img > Module.symvers
Compile the Module
Copy the module symbols into kernel build
$ cp /path/to/Module.symvers build/
Create a workspace elsewhere for the cp210x module
$ mkdir cp210x
Copy the cp210x source from the kernel source to your workspace
$ cd /path/to/L2.6.35_11.05.01_ER_source/pkgs/linux-2.6.35.3/drivers/usb/serial
$ cp cp210x.c /path/to/cp210x
Create a Makefile
$ cd /path/to/cp210x

$ echo "obj-m = cp210x.o"> Makefile
Compile the module
$ cd /path/to/L2.6.35_11.05.01_ER_source/pkgs/linux-2.6.35.3

$ make M=/path/to/cp210x O=build modules KERNELRELEASE="2.6.35.3-01274-gb455778-dirty"
Testing the module
On the radio, try to install the module to make sure it loads.
# insmod cp210x.ko

# dmesg

<6>USB Serial support registered for cp210x

<6>cp210x 2-1.1:1.0: cp210x converter detected

<6>usb 2-1.1: reset full speed USB device using fsl-ehci and address 3

<6>usb 2-1.1: cp210x converter now attached to ttyUSB0

<6>usbcore: registered new interface driver cp210x

<6>cp210x: v0.09:Silicon Labs CP210x RS232 serial adaptor driver
Try using the serial port as well.
Installing the Module
While it’s great to have a working module, it quickly becomes tiresome to manually install it each time the radio boots. To make it more permanent, we need to properly install it.
Install to the modules directory
# mount -o rw,remount /dev/block/mmcblk0p2 /system

# cp /path/to/cp210x.ko /system/lib/modules
We also need to edit the /init.rc file to cause the module to load on boot. Unfortunately, the root file system on which it resides is the kernel’s initial ramdisk, not a file system that we can remount as writeable on the system. Fortunately, we have this image as part of Hal9k_’s update.
Extract the initrd
Back to the desktop.
$ mkimage -l uramdisk.img

Image Name:   Android Root Filesystem

Created:      Sat Apr  6 08:49:03 2013

Image Type:   ARM Linux RAMDisk Image (gzip compressed)

Data Size:    183417 Bytes = 179.12 kB = 0.17 MB

Load Address: 70308000

Entry Point:  70308000
$ dd if=uramdisk.img of=ramdisk.img.gz bs=1 skip=64

$ gunzip ramdisk.img.gz

$ mkdir ramdisk; cd ramdisk

$ cpio -iv < ../ramdisk.img
Edit init.rc
Edit the extracted init.rc in your favorite text editor, and add the line for our new module, directly below the line for pl2303:
insmod /system/lib/modules/cp210x.ko
Rebuild the initrd
$ find . | cpio --create --format='newc' > ../newramdisk.img

$ cd .. ; gzip newramdisk.img

$ mkimage -A arm -O linux -T ramdisk -C gzip -a 70308000 -e 70308000 -n Linux -d newramdisk.img.gz new-uramdisk.img

Image Name:   Linux

Created:      Mon May  6 22:17:47 2013

Image Type:   ARM Linux RAMDisk Image (gzip compressed)

Data Size:    183159 Bytes = 178.87 kB = 0.17 MB

Load Address: 70308000

Entry Point:  70308000
Install the new initrd
Copy new-uramdisk.img to the root directory of your external microSD card on the radio. Rename the file to uramdisk.img. Reboot the radio, holding the volume knob and menu buttons down during the boot. You should see an indication that the update was successful, and the radio will reboot. The cp210x module should now be loaded on boot!
That wasn’t such a chore, was it?
Initial Software for the Android Car Radio
by balleman on May.05, 2013, under Linux, Radio
Rooting
Let’s face it, Android is far more interesting when you have full control of it. The software pre-loaded on the unit does not provide root access. Hal9k_ on the xda-developers forum has created a software update that provides root and adds some additional features. To perform the update, you place the files on the root of the removable SD card, power off the radio by holding down the volume knob/button, and start the radio by holding down the volume knob/button and the menu button simultaneously.
Network Connectivity
Not exclusively a software topic, but I’ll cover this here. For full functionality, it is desirable to have the radio with internet connectivity whenever possible. When at home, this means a WiFi connection to the home network. The location of the WiFi dongle provides decent signal strength to the home network from the usual vehicle locations and works as well.
For mobile connections, it is possible to use a 3G USB dongle to provide the unit with network connectivity. I don’t have such a dongle, and with mobile provider pricing structures such as they are, I have no intention of providing my car radio with a dedicated service at this time. The alternative is to tether to my cell phone, which is also an Android device. Right now, I’m using MacroDroid on my Nexus 4 to enable and disable the WiFi hotspot feature automatically. The rules I have are:
- On Bluetooth connect to the Radio, and WiFi is not connected on the phone, enable the hotspot.
- On WiFi disconnect, and Bluetooth is connected to the Radio, enable the hotspot.
- On Bluetooth disconnect from the Radio, and hotspot enabled, disable the hotspot.
This tries to prevent enabling the hotspot in cases where WiFi is available, but properly turn on the hotspot if driving out of range of the home WiFi. So far it seems to work relatively well.
One additional area of interest is how to show the cell phone signal strength on the radio. I found the Tether Signal Strength app that provides a capability for this. Unfortunately, the current design of the app makes the signal strength hard to see, and worse, is not easily automated to start on boot on the radio, or start on hotspot on the cell phone. I think either improvements to this app, or maybe a new one entirely, will be the solution.
GPS and Navigation
Always-On GPS
Android generally will only enable the GPS receiver when there is an application actively using it, primarily as a power-saving measure. Even though there are no real power usage concerns with this device, the default software still disables the GPS receiver when not in use. Since GPS takes some time to acquire, I really prefer it to be active the entire time the device is running. I found the ActiveGPS app to meet this need, but there are probably other 3rd party apps that do just as well. As with the rest of my Android devices, I installed GPS Status to be able to check the received signal strength from the GPS constellation.
Navigation
Google Maps and Navigation are certainly part of the solution for navigation on an Android device. I did want to try an App that provided similar functionality to the Garmin nüvi (ad) that I’ve used for years. While Garmin does sell navigation software for Android, from what I can tell, the reviews of recent versions have not been great, and it is also not currently available for customers in the US. I wanted something that would be fully functional when working without an Internet connection, since when I’m off exploring in the mountains and valleys around here, it’s fairly common to be without connectivity.
Currently, I’m using Sygic for this purpose. I’m not entirely sold on it, but it does appear to be functional. Depending on how actual use goes, I may just use it as a backup for the more accurate Google Navigation. Here are some notes, observations, etc:
- The navigation does not appear to be extremely efficient. I plugged in a destination of Renovo, PA from home, and the proposed route was something like 2 hours longer (and very far out of the way) as opposed to Google or the Nuvi.
- It has a small battery display which I have not found a way to turn off. It’s obviously irrelevant for the car radio.
- By default, it notifies on sharp turns and railroad crossings. While it starts out kind of novel, it quickly becomes annoying. Fortunately, these can be easily disabled in settings.
The jury is still out on this.

Vehicle Sensors and Diagnostics
It seems that the application for OBD2 stuff on Android is Torque, and it is pretty awesome.
OBD2 Interface
The most common way of connecting to OBD2 seems to be to use a Bluetooth to OBD2 bridge. The Bluetooth capability of the radio, however, is not accessible to Android. The updated software provided by Hal9k_ provides a work-around to this, by adding the kernel modules necessary to support Bluetooth. You are then able to use a Linux-supported Bluetooth USB dongle. You need to install a 3rd party Bluetooth manager application, since the Bluetooth settings applet is not included in the software. When paired with an OBD2 Bluetooth adapter (ad), you’re able to use Torque.
There are some apparent downsides to this approach. For the cheap adapter I bought, it is powered by the OBD2 port and stays active even when the engine is off. I’m not sure how significant of a drain this would be, but I would prefer not to deal with it. The second issue is related to security. The Bluetooth adapter uses a fixed, default security code for pairing, and appears to always be available to pair. It would not surprise me at all if the OBD2 could be abused to do terrible things, such as unlock the doors, by someone knowledgeable. Sure, this is probably a very small risk, but I’d prefer to avoid it. (I think those of you with OnStar are insane from a someone-else-can-control-my-vehicle-remotely standpoint).
Alternatively, Torque also supports OBD2 to USB adapters. Hal9k_’s software update also provides the pl2303 kernel module, which supports the USB to serial bridge used by many of these adapters. If you have one of these, the only additional thing you need to do is configure Torque to use it. While Torque does have USB settings in its menu, these appear to be insufficient and you need to create a configuration file that makes it think it is a Ca-Fi unit.
echo "finland_rds_ru" > /etc/carit_version2 ; chmod 644 /etc/carit_version2
Alas, the OBD2 to USB adapter (ad) that I bought does not use the
pl2303, and instead needs cp210x. I did successfully build and install the cp210x kernel module, but it was an ordeal that deserves its own article. The adapter is powered by the USB, so it does not draw power when the vehicle is off.
Sensor Monitoring
Torque provides a variety of dials and graphs that can be used to display sensor data. You place them on a grid on the screen, and can swipe to page between multiple screens. I found it difficult to get accurate placement using the resistive touchscreen, so I used a USB mouse for most of the screen setup. As far as the sensors themselves, I was just recently able to add what seems to be a transmission fluid sensor reading. I still can’t find a usable PID for fuel level, which I found odd, since my truck and previous car both support the general PID for this, which is apparently not common. I would also like to find a way to show more details about transmission operation, such as current gear.

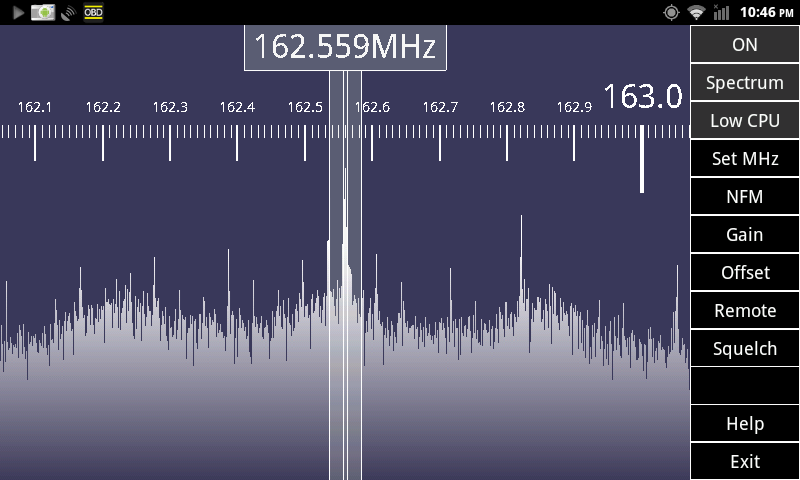
Software-Defined Radio
When I saw Doug give a short presentation on SDR on Android using the same RTL2832U/E4000 USB dongles that I have laying around, I knew this had to be an objective of my Android-in-the-car project. On the face of it, it looked as if it could be a problem. Most of the information on the SDR Touch software was on Android 3.0 or higher, while the head unit still runs 2.3. I also was concerned that the device would not have enough CPU power to make it work, or that the USB port would not have enough power to keep it working. Fortunately, these concerns were mostly unwarranted.
Out of the box, the software did fail to work. After some Google’ing, it was determined that the chmod that comes with this system does not support the -R option. This caused the software to fail when trying to change the permissions on the USB devices. Mounting the /system file system as read-write, and then linking chmod to the busybox binary, resolved the problem.
As far as CPU usage was concerned, it was not as bad as I feared it might be. Here is a table of observed CPU usage of the androsdr2 process, when performing NFM demodulation with different settings. In all cases, the rtl_tcp_andro process is running at a steady 5% CPU utilization, which is not included in the numbers below. Also, as one would expect and hope, when the app is not in the foreground it behaves as if the spectrum display is off. There was a noticeable, but not substantial, degradation in audio quality with the Low CPU option enabled.
| SDR CPU Selection | Spectrum Display | CPU Usage |
|---|---|---|
| normal | on | 57% |
| normal | off | 42% |
| low | on | 33% |
| low | off | 15% |
The user interface of the software is not very well suited (yet) for use in a vehicle. Too much user interaction is required to operate it. When loading the software, it does not automatically enable the radio. You have to select the “Off” button to turn it on. It does remember the last tuned frequency, but it does not remember the bandwidth last selected. In my case, to listen to the local weather band transmissions, it greatly improves the intelligibility of the audio to narrow the reception bandwidth. This requires something of a precise dragging motion on the screen, which is not trivial with the resistive screen, and is not really possible while the vehicle is in motion. Some minor improvements in the app could really improve this – such as remembering the last bandwidth, enabling the radio reception upon the app starting, and providing a means of having pre-sets of frequency and other parameters for listening to favorites.
Overall, this is still an amazing capability to be able to add to a car radio head unit.
There is probably more to say on this, but the article is long enough.
RAV4 Android Radio Install
by balleman on May.02, 2013, under Computers, Linux
A brief description of installing my Android 2DIN radio in my 2011 RAV4 w/ JBL.
Parts List
- Pure Android 2 DIN Radio (Generic or Ouku TH8581GA)
- USB WiFi dongle, included with the radio.
- Scosche TA2055B – RAV4 DIN Mounting Kit (ad)
- PAC TATO
(ad) – kit to integrate with factory amplifier
- AmazonBasics USB 2.0 4-Port Ultra Mini Hub (ad)
- ELM327 USB OBDII Adapter (ad)
- Short USB extension cable (ad)
- Solder, heat shrink tubing
- RTL2832U SDR USB dongle
Tools
- Plastic putty blade
- 10mm bolt driver
- Soldering iron
- Heat gun
Wiring Harness
Since I have the JBL audio system in the RAV4, I purchased a PAC TATO (ad) which included the necessary wiring harness, in addition to providing the signaling to turn on the factory amplifier. I connected the ground, accessory, battery, accessory, and illumination wires between the TATO harness and the radio harness. The TATO also came with an adapter to connect a PAC steering wheel control converter to the separate Toyota harness with those connections. I experimented and determined that the steering wheel control wire on the radio harness worked properly with the white wire on this harness, so I cut it off and wired it in. I soldered all connections and covered them with heat shrink tubing, also using heat shrink tubing to cover the unused wires that were not already covered.
The radio harness had no connections for a microphone, and I was not able to easily find a harness that supported the RAV4’s factory microphone or AUX input.

Old Radio Removal
I removed the trim panels using a plastic putty spreader that I had laying around. It was a little tough to get it inserted initially, but it did the job with no noticeable marking. After removing the trim panels, I detached the cables to them and set them aside. I then used the bolt driver to remove the 4 bolts to the radio and removed it, and then detached the radio from its cabling. In the course of repeating this several times (playing with the new radio), I ended up losing one of the bolts – so do better than me, and keep a tight grip on them or use a magnetic tool. You can watch this video of someone else removing the radio in a RAV4.
Placement of New Hardware
There is a good amount of space in the center console that easily accommodated the radio and associated wiring. The RAV4 also has a small secondary glove box above the main glove box. I chose this location to place the USB hub (in order to have it accessible), so I cut a hole in the glove box towards the center console. I routed the USB cable from the radio, as well as the AUX A/V RCA inputs, to the glove box. I also observed a void above the center air vents, above some insulation, that was readily accessible. In this space I placed the GPS antenna as and the WiFi USB dongle on an USB extension cable that was routed to the glove box. The OBDII adapter was attached to the OBDII port and the cable routed in the lower driver’s side dash into the center console, and from there to the glove box, the provided cable being sufficient.
SDR Notes
I also purchased and adapter and splitter for connecting the SDR dongle to the factory AM/FM antenna, but its performance was very poor when trying to receive weather band frequencies. I also tried placing the antenna that came with the SDR dongle in the same location as the GPS antenna, but it also performed poorly. For now, the provided antenna is stowed in the glove box, and can be used somewhat effectively when magnetically attached near the sunroof.

Finishing
With the radio attached to the RAV4 mounting kit, it fit easily back into the dash, and looks pretty good. Up next… software.